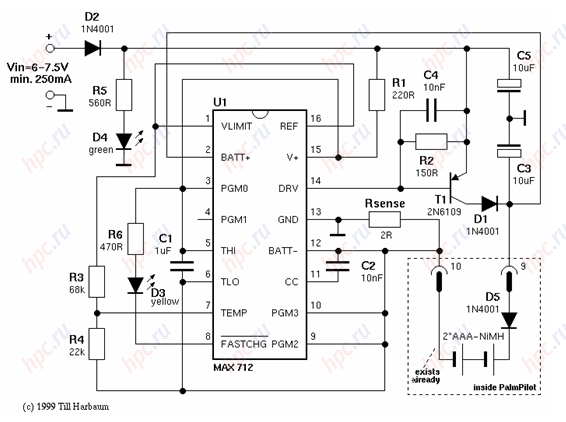
HPCru continues heading diy. Today we present to you the detailed instructions with pictures for assembling battery charger to recharge NiMH batteries directly into the PDA (on the model of Sony Clie SL10), from our readers, Vladimir M. Immediately stipulate that this material is essential reading only to lovers of self-assembly of various electronic makeweights for its handheld computers and other electronics. This experience is not recommended to repeat to those who are not too versed in the wisdom of e-filling and work with it. Editorial HPCru not responsible for the failed experiment. Those who dare to use our instruction, we invite you to share experiences to improve your Pocket PC in this category. About how to get to the page HPCru can be found in the article. And now - for the cause. On the experiments described below I was inspired by the experience Vladimira Suho, described in the article "How to use a soldering iron can be converted into Palm handheld computer in a very advanced device, Part 1." If you decide to make at your leisure battery charger, which I did, should be read carefully, not only with my article, but with this material, which describes how the scheme. So, I have a Sony Clie SL10. Nutrition of the PDA by using two batteries or NiMH-AAA batteries. The device is equipped with a miniUSB-jack for connection to a desktop PC, which has five contacts, but for the USB bus is used only four lines. Hence, one of the connector pins is not involved. I decided to use this contact for charging NiMH-battery directly into the PDA. We begin with the scheme.
 |
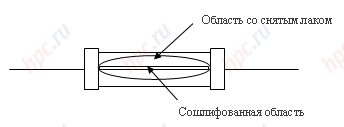
As the transistor T1, I used KT644 (any letter). You can use any pnp-transistor high power with a current collector at least 0.5A. Diode D5, D1 - KD243 (any letter). I measured the voltage drop across the diode is open to a maximum of 0.5A, it remains at 0.7V. The most expensive element of the scheme is to chip U1 (MAX 712). I bought it for 290 rubles. As a primary source was used from a cell phone charger. This charger gave stable voltage 5V to current 0.5A. Since the primary source of one volt less than the required 6B had to remove the safety diode D2. In this regard, be careful when docking the primary source of our scheme, do not confuse the polarity. Scheme I have collected on maketnitse, the connection is made using wire MGTF. All placed in a box from under the "Tik-Tak." Next, you need to pick up resistor Rsense for your batteries. I had a battery capacity of 750 mAh, which indicated rapid charging current 187mA. As the resistor Rsense take power resistor MLT-0.5W. Completely assemble the device. Connect the two series-connected battery through an ammeter with a current up to 1A (do not forget to connect the diode D5). As an ammeter be sure to use any digital (arrow has too much internal resistance). Turn on the device. The ammeter should show the current more than you need. Carefully remove the lacquer with a knife with a resistor Rsense until gray patina.
 |
Then fine emery cloth soshlifuyte gray powder until a white porcelain color. First soshlifuyte narrow strip between the contacts. Resistance will increase and the charge current falls. Increase medium grinded area to the point where the ammeter will show you the desired charge current. To be safe, cover with varnish medium grinded area resistor.I have to collect the charger looks as shown below.
Now you should at least difficult part - Finalization devaysa Wiring and plugs. MiniUSB plug I bought at the store for 25 rubles. Disassembled, it looks as shown below.
As we can see, one of the terminals in your plug is not part of desoldering the wire. Do the following. At the end of the needle files with a narrow edge sharpen and grind down the sides to produce an mikrostameska 1 mm wide. At the fork, departing at 1-1.5 mm from the edge of the plastic shell of the broken short contact scratched groove until the shiny surface of the contact.
From the two-sided fiberglass foil thickness of 0.5 - 0.7 mm cut plate of 5x8 mm. On all sides are chamfered to nowhere foil has not reached the edge of the plate. Cuts through the foil on both sides of the plate, as shown in the figure.
Tin foil strips. Insert the plate between the terminal and solder contacts to the plate tracks. Remain nepripayanoy one track in front of the plate scratched contact. A piece of copper magnet wire with a diameter of 0.1-0.15 tinning, make a small bend and solder as shown in the picture. A small loop is needed to wire after soldering was not under the interference.
 |
Soldering the wires in the groove on the soldering tip pulls the ten turns of copper wire 1 mm in diameter so that the forward end of the spoke length 5-7 mm. He sharpens the end and tinned. When soldering a scratched groove using liquid non-active flux (rosin solution in alcohol). Be careful when soldering provodnichok must not protrude beyond the edge of the plate and should not touch the adjacent track. With the help of a tester, check for circuit between the contacts, correct deficiencies. Positive lead from the assembled and tested charger apply solder to the track, labeled "+", negative - "-". Pripayanuyu wrap the plate with one layer of tape. I had a set of plugs without housing. For hard wire connection with a fork, I used shrink tube, the result is shown in the photo.
Now you need to make a revision in the PDA itself, by saving all the data on your PC. With the clock edged screwdriver or needle files unscrew six screws on the sides of the device.
 |
 |
 |
Put down the PDA screen. We begin to remove the rear cover from the lower left side. Then the top left, bottom right and the last upper-right part. Gently lifts the rear cover to prevent damage to the scroll wheel, located in the upper right corner. At the bottom of the Open PDA (see picture), we see the battery compartment and an outlet miniUSB-port. The battery compartment is mounted by two screws - the left and right. Right screw also holds the flexible fiberglass shawl with empty seats on its outlet miniUSB. From the battery compartment out two wires (black and red plus minus), which are connected to a special plug. This plug is inserted into the socket, the circuit board devaysa. Unscrew screws, gently pull out the plug and take out the battery compartment. At the same time relieved fiberglass veil with a rosette miniUSB. Itself is a socket for stiffness is inserted into the slots. Gently pull the upper edge of shawl with miniUSB socket and turn down it.
 |
 |
See that moving away from the wall five tracks, with only four of them go further in the fees devaysa. We are interested in track, which is going nowhere. Carefully Solder pigtail MGTF 15 mm long, pre-tinned on both ends. Shorten legs of the diode D5 and paste it to a scarf anode directed to an electrical outlet. Go to the anode Solder the other end of the previously installed wire MGTF.
Bare red wire is the battery compartment somewhere on the value of 1.5-2 mm. Solder to a bare piece of wire MGTF length of 15-20 mm. With the help of tape isolate place solder on the wire. Desirable to use a black insulation tape, it is thinner.
Install the battery cover and insert the power outlet to charge the device. Wires are neatly hide except soldered MGTF. Put in place shawl with a rosette miniUSB. Spin two screws, securing the battery pack and shawl with a rosette miniUSB. MGTF wire coming from the red power wire, apply solder to the cathode of the diode (see figure).
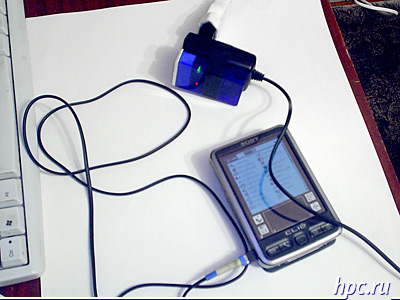
Putting the CCP. Insert the battery and connect through our miniUSB charger. On the charger the LED D3, is being charged.
Now, while charging the Sony, you can use while lying on the couch. Trifle, but nice.
 |
Finally I will say that the remaining neraspayannymi miniUSB plug contacts can be used to connect to your PC's USB, and instead of the primary source of 5V can enable output +5 V USB-port of a desktop PC. Good luck! From the Editor. HPCru is heading diy. Under her banner we propose to unite everyone who does not stop at buying a handheld communicator, a smartphone or any other mobile device of their dreams and continues to independently develop the purchased product in search of the ideal. Accepted for consideration by the stories with photos of the original solutions, including hardware changes, as well as software products of its own production is called "the soul" (not for money!) Who made your life better with a PDA and more fun. In addition, please send your practical advice on repairs, maintenance and other everyday realities - all of this, preferably with photos. In return promise to publish stories on HPCru, and, therefore, known in some circles:) Please send your letters to editor@hpc.ru. The authors, translation:


