 |
If you're reading this, you probably thought that it would be nice to deploy in their own home wireless network, like Wi-Fi (IEEE 802.11), and finally feel complete freedom of movement and comfort conferred by the latest technology. It's a shame because when in a pocket computer and a laptop Wi-Fi integrated, and use it plainly does not work. After all, no matter what was said in all sorts of handouts, but to deal with configuring the wireless network itself is not under force to each user. Unfortunately, manufacturers often pay attention too limited range of issues that are likely to occur when you try wireless konnekta. For example, most often in the instructions to the PDA described only how to connect to an existing wireless network. And here is how to organize the network, what equipment is best to buy, how to access resources on other computers, and most importantly - how to go online with the PDA in our Russian reality, and for wireless sync? - Here are the questions that really disturb users of portable devices, and that we have finally answered. In the first part of the workshop you are expected to advice on choosing between the built and purchased Wi-Fi, equipment for wireless home networks, detailed instructions on how to configure and open access to the files on your PC. Next step by step we will connect the PDA Pocket PC to the network. As an experimental we perform HP iPAQ h2210 with Wi-Fi adapter D-Link DCF-660W and Dell Axim X50V with integrated Wi-Fi. But that's not all. Gentlemen, you're in the second series!;) In the meantime, get down to what is announced above.
Wi-Fi congenital or acquired: what to choose? ..
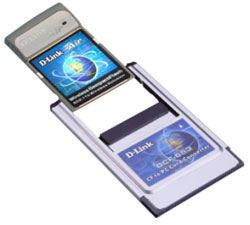
Your PDA has Wi-Fi? - Very good. No? - It does not matter. Wi-Fi adapters on our market a huge amount. Want adapter based on the CF card - please, or, say, based on the SD card - no problem! Today nothing can stop you to go online or to travel on a home network with your Pocket PC. All adapters for handhelds in general have similar features, and price is not much different. Models with a Compact Flash slot is more common and inexpensive, they produce different company: Pretec, D-Link, etc., their prices start at $ 60 Models with the form factor SD loves to indulge in the company Sandisk, and, most wireless cards from this manufacturer is equipped with an additional Flash memory (128/256 Mb). The benefit of this gain will certainly be, but for the money that you have to lay out (from 95 USD), is pleased to announce the highly questionable. Want to give only one piece of advice to users who have decided to acquire an external wireless adapter - advance, make sure that you have no compatibility problems. The fact that the adapters are designed for older operating systems, for example, Windows CE 3.0 can not quite work correctly on more recent versions of the same family of operating systems like Windows Mobile 2003. One of the easiest ways to "get out" - read the package list of compatible operatsionok. Only and then be ready to catch. Most sold today, Wi-Fi adapters were released two or three years ago, so no support for recent operating system they do not and can not be. Proceed as follows. First, select a card, and secondly, climb up on the Web and look for the latest drivers there. If these are found, then go ahead and buy the selected adapter, but if not, a wireless device to take is already dangerous. The probability of occurrence of problems can be as high ratio "50% to 50%." Therefore, I advise you to specify in advance when purchasing the possible return of the device, if find any compatibility problems.By the way, problems of compatibility can speak a variety of issues: from the banal work temporarily installed on the PDA software, and problems connecting to a wireless network where other handhelds with similar settings without problems, and ending with the absence or inaccessibility of "public some menu items, which, judging from the description, must be present in the Setup Utility Wi-Fi. Therefore the last council wants to address those handheld computer has not got - citizens, do not skimp, buy the handhelds with integrated Wi-Fi (IEEE 802.11) - and had no problems with compatibility you will never have!
Equipment for wireless home network
Well, with iron PDA undecided, go to the hardware for wireless networks. So, to deploy a wireless network at home, we need special equipment, and, in the first place - an access point (aka Access Point or short - AR). Access Point - it's the same device that, and allow all your wireless computers to "see" each other as if they were connected by wires. Since then the fun begins. It would seem, the business-then - went to the store and bought one of the exposed Wi-Fi devaysov capable of performing the function of AR. However, once you do e-shopping, as you undoubtedly will visit questioned - range of prices to "centers of home Wi-Fi universe," ranging from 40 to 150 dollars. And this despite the fact that, judging by the specs, all the devices have almost identical features. What to choose?
In order to make sense of this abundance of wireless, you should take note of several issues that manufacturers of access points like "fooling" the head of buyers. The first - backed standard. The list of standard Wi-Fi, existing at the moment, there are only two abbreviations:
- IEEE 802.11b - modification of the original Wi-Fi data rates up to 11 Mbps
- IEEE 802.11g - the latest version with a capacity of up to 54 Mbps and is fully compatible with IEEE 802.11b. Please note that all speeds are in Mbps, that is, in megabytes per second, for a transfer in megabytes (MB), we get about 1MB / s (11 Mbps) and 5 MB / s (54 Mbps). Both of these values into practice completely unattainable, at best, an access point can give half that speed. But back to the sellers.
In order to mislead consumers, more for advertising purposes, they invented a few more varieties of Wi-Fi:
- IEEE 802.11b + («Plus», etc.) with data rate 22Mbit / s or 27.5 Mbit / s
- IEEE 802.11g + («Turbo» and the like) with promises of speeds up to 108 or 125 Mbps. All these indicators are usually distinguished psevdoskorostnye very bright color and placed on the packaging equipment in plain view. However, in reality, such figures are irrelevant. Point IEEE 802.11b + no better and faster than IEEE 802.11b, and IEEE 802.11g standard devices totally inferior IEEE 802.11g +. So, to take this fact on the note, and not to overpay for such "innovations". Incidentally, I have not seen a PDA with integrated Wi-Fi standard IEEE 802.11g, as had business with the individual PDA adapters similar standard. Here, while reigning 802.11b, which means that the high speeds you can not see. However, they appear not very much and want. On the internet bandwidth will be enough, music online to listen to - too. And still advise you to refrain from buying wireless equipment that supports only IEEE 802.11b, because you never know what - whether you have a laptop at home or be got a second computer - excess capacity never hurts. The second point that should be considered when selecting AP: claimed range of wireless devices - 50 m, 70 m, 100 m and more - in terms of our apartments are completely unattainable. Moreover, 20-30 m from the access point - this distance is difficult to overcome even laptops with good integrated Wi-Fi adapter, and only for low-power handheld computers the ultimate dream and does limited to 10-15 m.The fact is that between the range of a wireless point and bandwidth Wi-Fi Network of a direct link. That is, with increasing distance from the access point very last drop. And the third fact that I want to make you happy, as a probe Wi-Fi equipment: more expensive AR does not always have a great range of work. A very decent piece of iron can be purchased fairly inexpensively. Of the two AP value of, say, 70 USD and $ 100 very often the first copy is the best choice. Well, what if you can, guided by the recommendations listed here, make the right choice? - Personally, I could not. The fact is that, looking at the AP and studying its performance on paper, it is absolutely impossible to predict how it will manifest itself in the case. Over the last year I had the opportunity to test more than 15 access points from different vendors. Of these, I can recommend to our readers just three wireless devaysa, in my opinion, the most respectable: TRENDnet TEW-410APBplus (114 USD), Asus WL-300g (78 cu) and D-Link DWL-2000AP + ( 64 USD). All points of support fast Wi-Fi (IEEE 802.11g), are stable, have greater range and are equipped with excellent Russian configuration instructions.
Which network will be constructed?
It will certainly go on the wireless network. Here are just depending on which method of accessing the Internet you choose, you get more or less of a problem with the settings and the choice of equipment. For example, in the simplest way of connecting using a wired version of the classic analog LAN, when the total output in the WEB is organized through a shared computer, connected to the internet. The second, more complicated way to connect to imply that the cable to your Internet service provider access point is connected directly. Next, we consider the features of both variants on the example of an access point Asus WL-300g.
The first variant: a simple connection
Way to connect through a shared computer boasts two big advantages: easy connection and easy setup, while eliminating the need to equip your home PC optional wireless adapter. The only drawback of this method is not as critical: the Internet will only work when the main home computer.
Given: a home PC, no matter how connected to the Internet (leased line, Stream, etc.).
It should be: to deploy Wi-Fi network.
Need: access point, and an additional Ethernet card for home PC (7 USD). Proceed. Install a second network card in your PC. We get a wireless AP and the network LAN cable coming in the kit, connect it to an additional network card. After that connects to AP Power Adapter cord, turn it into an outlet and click the button «ON» on the back of the access point. The front panel lights illuminate: «PWR» - power is applied, «Air» - wireless network is active and the indicator «Link» - wired connection to an Ethernet network is active. To switch to the access point, you must reconfigure your network card. To do this, click the right mouse button on the icon "Network Neighborhood" - "Properties". Before us is a list of available network connections. Right click on the second network card and select Properties. Before us there is a panel with network settings.
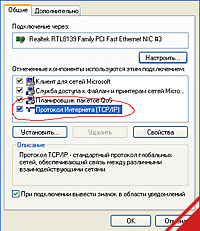 |
Choose - the Internet Protocol (TCP / IP) »and click -" Properties ". Appears another window with the settings. The only thing we have to do - is to establish a tick in the box "Use the following IP-address" and specify the network card IP address within the same range as specified in the wireless point of default. Exact IP access points specified in the instructions for your network card, enter the same address, wherein only the last digit. In the case of the Asus WL-300g address by default - 192.168.1.1. Therefore, our IP network card can take any value from 192.168.1.2 to 192.168.1.254.Introduce, for example, 192.168.1.2, the subnet mask must specify - 255.255.255.0. Setup is complete, we press "OK". Then come back to the window Network Connections, right-click on the icon corresponding to our network card and select the menu item - "Connect". After a few moments in the lower right corner (system tray), we have a message - "The network connection is established." Now it's time to move on to the AP settings. In nine cases out of ten point setting Wi-Fi are made via WEB interface. Start the Internet browser, and preferably Internet Explorer, because alternative programs do not always work correctly, and in the address field, enter the IP access point - 192.168.1.1. Immediately in front of us a window pops up enter "Name" and "password". These two parameters are required for admission to AP settings and defaults are set as follows: Name - «admin», password - «admin». Them we introduce.
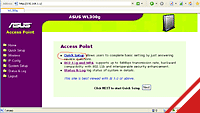 |
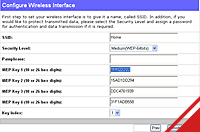
Next, get to the page setup WL-300G. In the first box, we propose to make a quick adjustment access points - Quick Setup. Select this item and do the minimum operations necessary for the organization of a wireless network: enter the network name (SSID), enable WEP and enter the key.
Complete set of AR as follows: using a menu item in the left side of the browser window (IP config), set on the AP, "a static IP» (Static IP), for example, 192.168.1.254, subnet mask - 255.255.255.0, gateway is the same leave empty. In the setting of Wireless prevent the automatic distribution of IP addresses to wireless devices, that is, turn off the DHCP server: «DHCP - disable». With this setting, AR will act only as a physical environment to access wireless devices to your PC.
When configuring any access point to remember several points: - If you owe nothing to change the settings page, then the next time the configuration changes you may be asked to re-enter your username and password.
- After completing the settings on any of the pages please click on one of the buttons: Apply the changes and remember you can go to the following settings, Finish activates all changes that were made prior to clicking on this button, and overrides the access point. It is very important, do not forget that before the reboot (Finish) your changes will not take effect!
- After a reboot, and the entry into force settings AR necessarily change the IP address of the network card connected to Wi-Fi point to 192.168.1.1.
Thus, the settings are completed. The last thing you want to do is open up the PC Internet access for your wireless devices. This setting is very easy, using standard operating system Windows XP. Go to the properties of "Network Neighborhood". On the network adapter connected to the Internet, right click and select "Properties" - "More". In the section "Share Internet Connection" set a mark - "Allow other network users to connect to the internet on this computer" and "Allow management of shared Internet connection" (if necessary). Then press the "Options" button and choose the services that run on our network (if the network will only be used for Internet access and file sharing, you choose does not need anything).
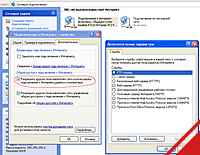 |
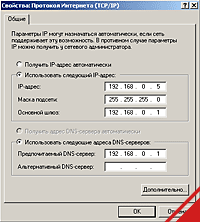
Formally, after such a configuration, the NIC connected to a Wi-Fi point, must occur following changes: automatically assign IP-address 192.168.0.1 (this and so we asked ourselves) will switch services - Distribution DHCP and proxy DNS. You will need the wireless devices to install all the network settings to "automatically obtain". Unfortunately, in practice, including me, sometimes things are not working as it should be. If nothing happens, it is better to leave that we have introduced manually configure the network card and access point, and then customize wireless device - handheld, laptop or other computers. Here's how. Go to the properties of your wireless network adapter - Configuring TCP / IP ». Be sure to specify that the IP address you have "static" and manually set the Wi-Fi devaysa free addresses from the range of 192.168.0.2 ... 192.168.0.254, with the exception of address AR. Subnet mask, enter: 255.255.255.0, but as the address of "gateway" and make sure to specify DNS address of the network PC card is connected to AP, that is - 192.168.0.1. Otherwise nothing will work.
 |
Option Two: the complex connection
Complicated connections, it is correct, require you more time, settings, and knowledge. But your wireless device will never depend on what is on your home PC or not. Method described below, is, incidentally, the only recommended by the manufacturer of wireless equipment. The fact that the connection point of access to the Internet directly, bypassing any whatsoever computers - the most common variant abroad. For us, simply translate instructions for installing and configuring hardware, and the localization for our Russian network "zamorochki" Nobody thought, but in vain ...
Given: a home PC, no matter how connected to the Internet (leased line, Stream, etc.).
It is necessary to: expand the "correct" Wi-Fi network.
Need: access point and wireless adapter for PCs ($ 30). Characteristics of the national connection to the Internet we are: the basic way - a leased line. When the user in addition to the Network are available and other benefits, such as network resources across your home network provider, including computers of other users. These home networks are now very common and account for hundreds and even thousands of PCs. So that one of the most important tasks of any provider that provides services to a large number of users - the unique identity of most users in the network. In this case, the objectives of the ISP - two: avoid the theft of Internet traffic the most advanced users and does not allow you to share that most traffic with its neighbor. After all, our service providers is not the most democratic prices. Most often, in practice we are confronted with such an approach: the more traffic you pay, the cheaper it will be, but all of megabytes, which "will not eat" your PC to the settlement and the end of the month - will burn. In addition, service providers earn their connection. It does not matter that the second PC is in another room - if you please, pay for two. I believe that most of our readers on this bait are not kept, but simply use the output of the network via a PC connected to the Internet. This is the case we discussed above. Direct the same connection, which we will discuss today - more comfortably. However, as all home PCs, laptops and handheld computers to avoid all the traps, placed by service providers on the way to the general Internet? .. The unequivocal answer is not here. But remember that it can be done always.And the first things you will need to decide - this is the way that identifies you to the service provider network.
To date, I met two basic approaches: - Identification of the MAC address. In this case, when connecting to the internet is not required to enter either the name or password, or anything at all whatsoever. You identify the special address "sewn up" in your network card. This address is called a MAC address. This identification is based on the fact that the two network cards with the same MAC in nature should not exist. Interestingly, the identification of the MAC lead to a nasty problem - when you change a network card to another on the Internet you will not enter until until fail to report such a replacement provider.
- The identification of a user name and password. The essence of this method - in the absence of binding to a specific hardware. To log into the network need only enter a user name (login) and password (password). This is a more reliable option than in the first case, and, interestingly, most access points, this method of identification of support.
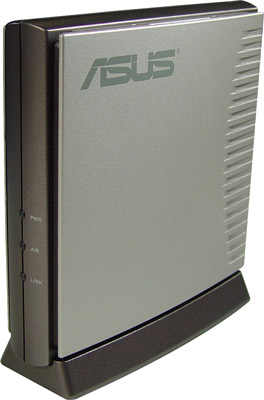
So you've decided which of these options is adopted in your network? In this case, it's time to choose the perfect AR. The most important feature of the equipment that you will buy - is the ability to access points to work in a special mode gateway »(Gateway). The second feature - wireless equipment shall maintain the way of identification, which is used on your home network. And with that you have no help. My experience in operating various Wi-Fi points shows that details such manufacturers specify only the descriptions of going to the CD and store it, alas, is not clear. For those who are reluctant to bother a non-trivial matter of choice of AR, I can recommend besides the well-known candidate to me - ASUS WL-300G. This versatile device suitable for connection to the 99% local LANs.
 |
However, I note a couple of important points when selecting equipment. Users who access the Internet through a local home network, you must use AP with an Ethernet port, for example, ASUS WL300G. Those of you who use the services of "STREAM" and his ilk, will approach the router ADSL, for example, D-Link DSL-G604T. The following discussion focuses only on how to connect via LAN Ethernet. Proceed to configure. Previously, you should save all settings, which are produced by the network card connected to the ISP. Click the right mouse button on the icon "My Network Places - Properties, click on the icon of the network card right click and select Properties. In the result pane with network settings, the card will choose "Internet Protocol (TCP / IP)» and click Properties. Appears another window with the settings of IP address, subnet mask, gateway and DNS. Most often, all these parameters are set as shown in the picture below.
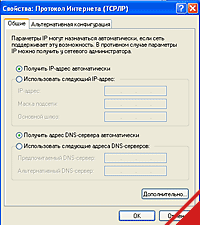 |
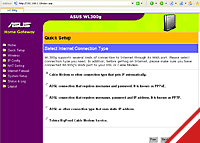
If in your case, given the specific numbers, be sure to rewrite them on paper. If your network uses a MAC address for identification and even if not, just in case, perform a determination of MAC. To do this, go to the computer in the Start Menu - Run, type in the line "Open" the file name - "cmd", then press Enter. In the resulting window, type: "ipconfig / all" and find a pile of precipitating lines of the field "Physical Address" and the numbers opposite. This is the MAC address, it looks like this - 61-83-36-7A-33-1D. Copy the MAC on leaf, he will also come in handy.Now we are safely pull out of the network card LAN cable from your ISP and connect to the desktop to an access point. About how to reconfigure the network card to work with AR have been told, you need to repeat the settings from the section "Simple Connection" and enter through the WEB interface to configure Wi-Fi points. Configure a direct connection to the ISP is very different from what we have done in the "simple connection. To get started go to the section System Setup - Operating Mode and change the mode to AP - Home Gateway, and then click Apply. Home Gateway - this is the regime of "gateway", which enables all computers on your wireless network to go online. After the regime change automatically starts the setup wizard, and we consistently perform all the steps. The main thing awaiting us on the page Select Internet Connection Type - page Case select the type of Internet connection.
Asus WL-300G supports and can simulate almost all possible ways by which you can outsmart the provider: - Cable Modem or other connection type that gets IP automatically - a connection to a cable modem or any other type of connection where the IP address is allocated automatically. This case is suitable for those who identify by the MAC address and IP and other network settings are automatically allocated.
- ADSL connection that requires username and password (PPPoE) - a connection that requires only a username and password. All other settings will be set automatically. The second most common way to connect to the network.
- ADSL connection that requires username, password and IP address (PPTP) - a connection that requires the username and password, IP addresses and other network settings that you copied down on paper.
- ADSL or other connection type that uses static IP address - a connection that requires manual input of IP and all other settings (gateway, DNS).
- Telstra BigPond Cable Modem Service - method of access to the network for some of the foreign provider.
 |
Specify your connection method and proceed to the next window settings. Here, enter your network settings (IP, etc.) and parameters identification on your network (MAC address, user name and password). Those fields that are unfamiliar to you, or were not filled in your network card - do not touch. After completion of the access point settings from the wired network (ISP), begin the familiar wireless network settings. We enter the network name - SSID, turn on security - WEP encryption or WPA. For the first time is quite enough encryption WEP-64bit. In the WEP Key 1 is entered our key - any 10 hexadecimal (or decimal) numbers, and in the Key Index select the key number "1". Click Finish, and click - Save & Restart. The access point reboots and the settings take effect. Everything else is now possible to configure the AP will be implemented only a wireless way, with our network card wireless equipment common language no longer find it. So that resort to such measures: Disable Access Point on your PC and connect it to the LAN cable from your ISP. Then you can start setting up a wireless network on our computers. The most important parameters to connect to a wireless network with Internet access via a PC already been briefly described. In the case of "complex connectivity" is still easier. To connect a laptop or PC in the network settings, select "Obtain an IP address automatically" and "Obtain DNS server address automatically". After a few seconds, the OS detects the wireless network and displays a message about this in the system tray. Click on it and in the resulting window you'll see the name of the observed network with the proposal to connect. Click "Connect" and do not forget to enter the WEP key. Very often, for notebooks and PCs bundled with Wi-Fi adapters are special utilities to configure the wireless connection. Work with them should not cause any difficulties: select the desired network, enter an encryption key and connect.If you have problems, read the instructions:) In addition to Internet access that you have had to appear, from any computer connected to a wireless network, you can through a WEB interface to access the AP settings as well as you did on the LAN cable. Typed in the browser IP point, enter the user name, password and donastraivaete AR at your option: increase the WEP key to 26 digits, enter the MAC address filtering, etc. etc.
If something does not work ...
Is there a simple way of checking the work your Wi-Fi network or not. Click the left mouse button on the wireless connection icon in the System Tray your PC. In the box under "Activities" look at the number of messages sent and received packets. If the number of packets received is 0, then the network you have a problem.
One of the most popular options, why users with properly tuned parameters can not connect to Wi-Fi networks - firewalls (firewalls). It could be third-party programs, such as Outpost Firewall, but often prevents connection firewall built into Windows XP SP2 (included in the composition with Service Pack 2 - SP2). If you have something not work, try to temporarily disable this protection.
Open access to the files on your PC
Wireless network - is not only online but also hundreds of thousands of files that can be shared over the network, the music that you can remotely listen to, movies that can be remotely look. That all that was available for all computers in a home Wi-Fi network (PCs, laptops or handhelds), you must create a "working group" and open access to shared folders and files, that is "this user" resources.
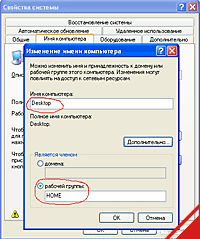
Create a "working group" or connect to an existing PC or laptop can use the following manipulations: - Right-click on the icon "My Computer" in the dropdown menu select - "Properties".
- Click the tab "Computer Name" and click on the Edit button.
- In the resulting window, type "Computer Name" in section "is a member, click -" working group "and enter your own name, it must be the same for all computers on the network.
- Reboot.
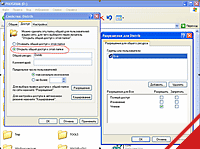
Now open access to the folders. Click on the icon in My Computer or Windows Explorer, select the drive and directory to which you want to share. Click the right mouse button, select the menu - "Sharing and Security." In the window that opens, select - "Share this folder". By default, folders are opened only "read". If you want to change access type, or specify to which groups of users folder will be available, click the "Permissions" and make the necessary adjustments.
Now users of all computer networks are becoming available all the files in the "rassharennoy" folder.
Connect PDA
If a conventional computer is very straightforward, then, handheld computers, users there is an order of problems.In this section, we connect to the two different handhelds based on Pocket PC: a recent top-selling HP iPAQ h2210 with an external adapter D-link DCF-660W and new season, Dell Axim X50v with built-in Wi-Fi standard, 802.11b. Moreover, thanks to our instructions, you will learn how to configure wireless internet access, access files on other PCs on a network, as well as exchange data between a PDA and desktop via Wi-Fi.
Connecting HP iPAQ 2210 with Wi-Fi adapter D-Link DCF-660W
I shall warn that depending on the adapter, the steps may vary. But in general, act as follows: - Include PDAs and set in its expansion slot Wi-Fi adapter. Any warning messages issued by the OSes, not paying attention and we press "Cancel".
- Installed on the PC (which synchronizes your handheld device), drivers from the disk that came. The program Active Sync will give the message: "The next time you connect your mobile device on it will download your application installed.
- Synchronize PDAs c desktop computer. During this process the software from D-Link is installed on the handheld.
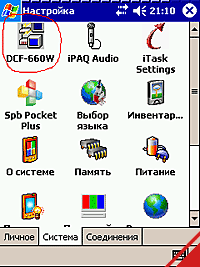
- Take out a PDA from cradle. Proceed to setting up Wi-Fi directly to your mobile device. Adapter Configuration Utility DFC-660W is located in the "Settings" - "System".
 |
- By default, the adapter is configured to automatically obtain an IP address. Go to the Config tab and set the mark in the section ESSID - Auto Detect. It enables mobile devices to automatically detect the available networks.
- Here, on the tab Config, given the type of wireless network, set «Network Type: Infrastructure». This means that you are working on a wireless network access point mode Ad-hoc, implying a direct connection between two computers via Wi-Fi.
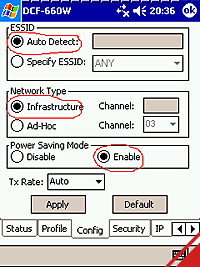 |
- Mode Power Saving Mode, leave on. This will allow Wi-Fi adapter to "fill up" at a time when the exchange there and save you battery power. Then click Apply.
- Go to the tab Security, select WEP Key Type and enter the WEP key. Click Apply.
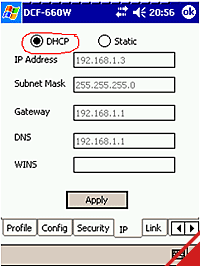
- Go to the tab IP. Depending on what settings are used in your radio - automatic or manual - you either turn on DHCP (to automatically get all the settings from the access point), or select Static and enter all the network settings manually. And, if you're using DHCP, in the corresponding rows (IP Address, Subnet Mask, etc.) will be displayed assigned DCF-660W value. Click Apply.
After completing these settings after a while your handheld should connect to the network.While connecting the operating system can give you a message - "Found new network" - "Such a" continue "Such a network connects to" and two options to choose from - The Internet and Work. Be sure to select the Work. From this moment you are online!
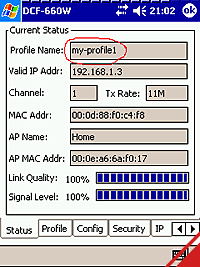
Finally tell you about a few useful sections in the settings of the adapter, which was not mentioned above. Status tab displays the current status of the connection: information about the MAC address of access point MAC wireless adapter, the name of the current profile, the link quality and signal strength. Located next tab Profile handy if you have to work a few Wi-Fi networks with different settings. Do not enter the same several times a day new WEP keys, IP address, etc. Profiles are implemented in such a way that for each specific network, you can save your configuration Wi-Fi adapter, and then call the profile in one motion the stylus.
And the last tab, which actually you should always begin work on the network, - ApBrowser, providing a list of detected access points around. ApBrowser - irreplaceable thing, when you are surrounded by several wireless points and have to choose which of them to connect. Simply locate the hot spot and press Join.
Connecting a Dell Axim X50v
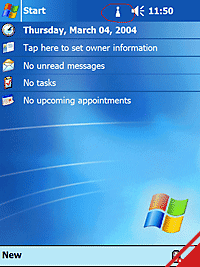
As it is funny, but to connect handheld previous generation 802.11b adapter with external was easier and faster than the Dell X50v. While here, by and large serious difficulties have arisen. Thus, we believe that we have a wireless network such as "easy connect" to automatically be delivered to all devices on network settings. The first thing we should do - at the end of a handheld computer click the inclusion of Wi-Fi adapter. Immediately pops up a message of the operating system - discovered a new network - Network Name. At the suggestion of OSes choose the type of connection - Work. At this time the CPC has not yet connected, as evidenced by the corresponding icon on the top panel.
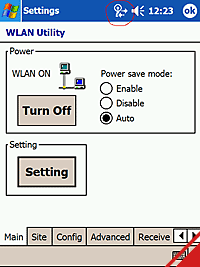
Since our network is encrypted, you must perform additional configuration. To do this in the system tray press on the green icon settings to connect to Wi-Fi network to fall into a setup WLAN Utility.
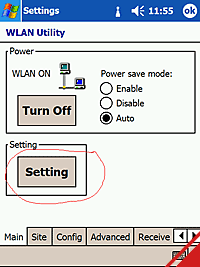
In the main window, you can programmatically enable or disable the wireless adapter (Turn On / Turn Off), activate the power saving mode and go to settings - Settings. Click on this button and get into the box configuration of wireless networks.
Choose the section Network to access network types to which you are trying to connect:
- Only Access Point means the only network with an access point
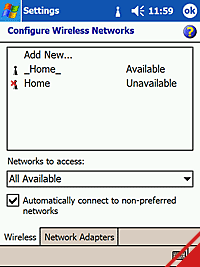
- Only computer-to-computer - a network between two computers. Better to leave the default settings - «All available», that is - all available online, and to establish a tick in the box Automatically connect to non-preferred networks, ie, "Automatically connect not only to preferred networks, and all in a row. Now in the top window click the stylus on behalf of our network («_Home_»).
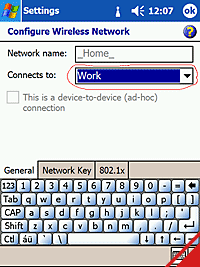
On the first tab - General in paragraph «Connects to:» - choose Work. We turn to the tab Network Key.
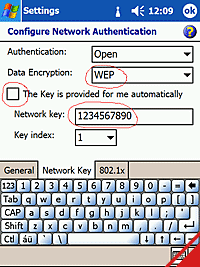
Next, select the type of encryption (Data Encryption) - WEP, remove the check mark from the window of "The Key is provided for me automatically" and enter the key that is used in your network. In the upper right hand corner click "OK". In this case, we return to the window to configure networks, and from there go to the tab Network Adapters.
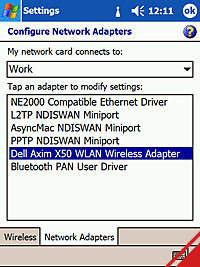
Make sure the top drop-down menu choose - «My Network card connected to:» - «Work». Now click the stylus on the name of your wireless adapter - Dell Axim WLAN Wireless Adapter. Get into the section of network settings.
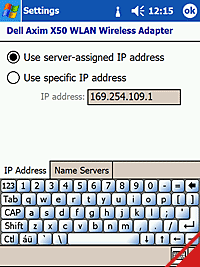
Tab, IP Address, select Use server-assigned IP address, if your network service enabled DHCP or specify the IP explicitly. To do this, check Use specific IP address. Tab Name Servers.
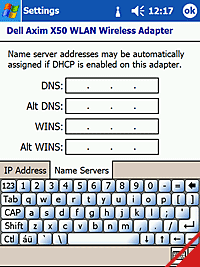
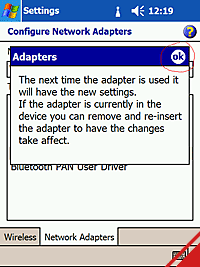
Leave all the default settings (ie, empty) if DHCP is enabled, or enter a specific address in the DNS otherwise. Other fields (Alt DNS, WINS ...) leave blank. Click «OK». In this case, the operating system displays a message that the settings take effect the next time the Wi-Fi adapter, and will also offer this adapter to remove and reinsert it.
Frankly, to do this operation with built-in adapter will be problematic, and therefore acquiesced and click «OK», then again «OK» and go into the settings WLAN Utility. For the entry into force of plants, click Shut Down Adapter »- Turn Off, and then" Activate »- Turn On. We are waiting for a bit - and voila! - Icon connected to a wireless network (top panel) is changing its view of the "connected".
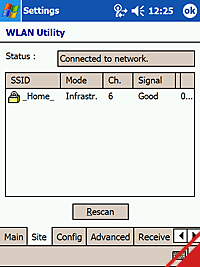
Now go through the rest of the tabs WLAN Utility. Site tab displays the detected wireless networks.
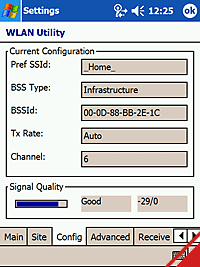
Config tab displays the current configuration.
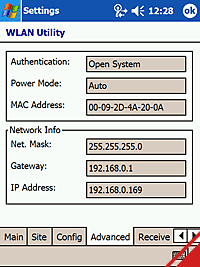
It also displays the network name (SSID), type of connection, the channel number (Channel), the signal strength (Signal Quality). The Advanced tab shows additional wireless adapter settings: authentication method, the energy saving mode (Power Mode), the physical MAC address of the Wi-Fi adapter, and entered manually or received automatically the network parameters (IP, the mass of the network gateway).
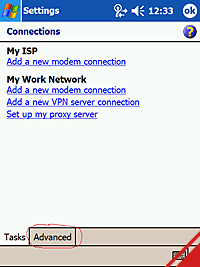
Tabs Receive and Transmit little use in the work here shows the number of accepted and sent on the network package. Under About you will find the version number of utilities, drivers and firmware. Press «OK» and exit from the WLAN Utility. It's time to start a web browser. Run ... and then gets a message from the Windows Mobile operating system with a proposal to set up a Proxy, agrees - jumped in the window click Settings. At the same time we get to the tab Connections, where complete our setup.
Proceed to the Advanced tab and click Select Networks.
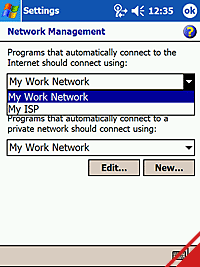
In the window of Network Management in the top drop down menu «Programs that automatically connect ...» specify - use the connection - «My Work Network» (instead of the default My ISP). We press «OK» and again «OK». Thus, we returned to the browser window. Trying to get on any site.At this time the connection is no problem.
Regarding the latter setting, we did it at any time is available here: the menu Start - Settings - tab Connections - Icon Connections.
At this setting Dell Axim X50 is fully completed. In the second part of our workshop we will discuss access to network resources with a PDA, wireless synchronization, and additional opportunities for Wi-Fi. The authors, translation:
Skusnov Alexander


